
Since then, I've settled for just making waves by braiding my damp hair into two to five braids depending on how small I wanted the waves to be. But still, I dream of curls~
I've tested this new method out four times now, and it has worked every time. I used no hair products at all, so I'm sure you can get a neater or more voluminous effect with various fluffing sprays, styling hold mousse, curl enhancers, etc.


Straight after taking my hair out without separating the curls it looks like this:

After a bit of fluffy and putting it up in o high ponytail (it is so hot now!) this is what it looks like at the end of the day:

Steps!
Start with almost-dry hair. You can do an all-over hairdryer after a shower or let it air-dry until just a little bit damp. It only needs to be damp enough to be molded into the curl shape, but dry enough that it won't continue to hold water throughout the night. You want it to fully dry by next morning!
Get a scarf or other long strip of fabric that you can use to wrap your hair around. It doesn't need to be as long as your hair, since the length of your hair will be shortened after the wrapping.
 |
| Tip! A thinner scarf will give tighter curls and a thicker scarf, looser |
Place the center of the scarf at the top of your head. I place mine about three fingers' width from my hairline.
Separate a section of hair parallel to the part about two fingers' width. I find it helpful to tie off the other half of hair and scarf so it doesn't get in the way.

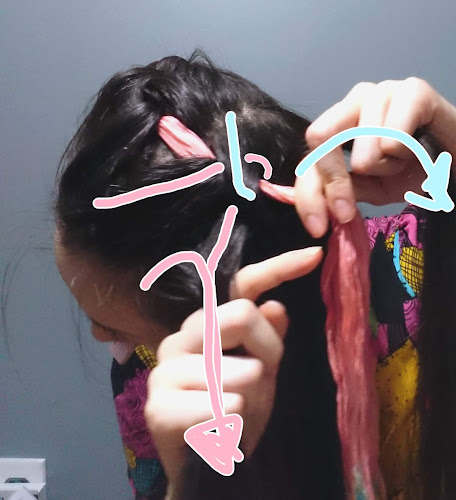
Split this section of hair in half perpendicular to the part and place the scarf in the middle. This method gives four total curls instead of two, so you can have more varying directions.

Wrap the first lock of hair all the way around the scarf. I start with the lock closest to my face so it will end up flowing away from my face right from the root.
 |
| Crossing over~ |
 |
| Wrapping back around! |
Now wrap the other strand around the scarf in the opposite direction. This will give you more mixed waves!
 |
| Crossing from back to front |
 |
| How the two strands are wrapped |
Now you will need to pick up another section of hair from the front (as before, just lower down on your head), combine it with the first front section (pink) and wrap it around the scarf as before. This sounds a bit confusing, but it is the same concept as doing a French braid.
Pick up new sections of hair as you work your way down, but this time you are wrapping the hair instead of doing crossovers as you would in a braid.

Here is a little video to show how I do the wrapping. Hope that makes more sense!
Continue this way down the length of your hair. This is pretty self-explanatory. Secure the ends with a small hair elastic.

If you do it neatly enough, maybe it can be a hairstyle?

For sleeping, I wrap the ends around my head and knot the ends of the scarf.

The next morning, you wake up and just take out the elastics and unwrap your curls! Try to do this carefully to make sure you don't cause any frizz. If your hair is prone to frizziness, perhaps try some taming products before you do the wrapping.

 |
| Looking a little wild here, but look at the curls!! |
Fluff up the roots of your hair with your fingers in a zig-zag fashion and style how you want!
Tip: Change the parting of your hair to give you more volume at the roots. For example, if you want to part your hair on the right when finished, first part it on the left when you are wrapping the hair the night before. Then after taking everything out the next day, part on the right, and by flipping your hair over to the opposite side that it had been laying before, it'll be fluffier!

Currently I've been just putting it up in a high ponytail every day because of how hot it is, but I think this hair texture could look good in a variety of styles! Twintails with an Alice band KC, a half-up pony with a large ribbon and many hair clips, etc.
Have fun experimenting and I hope it works out for you too!!
What are your favorite ways to add texture or volume to your hair? This likely applies just to straight-haired people who lack this volume and texture naturally ^^; But I'd like to hear your ideas or other tutorials you seen/tried~
No comments:
Post a Comment
please share your thoughts!