Tuesday, July 31, 2012

Lolita Runway Challenge~ Patterning!

Thank you to those of you who are keeping up with the challenge! I guess it proved more difficult than I had anticipated ^^;

This week we are just checking in with our patterns~

As it turns out, most of us are making dresses that don't need too much patterning :P

1. Sparklewolfie
Photobucket
This is the bodice pieces. They're enormously long because it's fully shirred. The final dress will be about half that size!

Let's see who else has their patterns done!

2: Miss Rose
Photobucket

7: BlackOnyxHime
Blog Post Here

Late Entry:
4: Eithne
Eithne
Thank you ladies!

The next step is:
Make your dress! Hooray! Here is the fun part! Post at least one in-progress photo, please. I will post the in-progress shot(s) along with the finished photo at the end of the challenge.
Deadline: September 10th

Should you run into any trouble or have questions, feel free to contact me at theabclolita @ gmail.

I cannot wait to see how these turn out!

Tuesday, July 24, 2012

Dinosaurs and Bunnies

I have a slight obsession with dinosaurs, so I went to see the Dawn of the Dinosaurs exhibit at the Chang Kai-Shek Memorial Hall on Wednesday! Then there was a tea party meetup over the weekend where half of us ended up wearing bunny motif dresses!


Click the photos to make them larger

Photobucket

This is me and my friend in front of the display for the exhibit ^u^ We're making imitation poses.


Photobucket
Dinosaur!

Fun fact: in Chinese, the words for "dinosaur" literally means "scary dragon." In Latin(?) it is "terrible lizard."
Photobucket
Crocodile-type dinosaur!
In Chinese they were called "scary crocodiles"
Photobucket
I am not sure what this is :o Some type of dinosaur!
Photobucket
This one is what we dubbed the "Derpasaurus"
Also know as the parrot-frog-iguana
Photobucket
A baby derpasaurus is being eaten
Photobucket
This guy is going to steal the other dinosaur's food!
Photobucket
A stamp for returning to the exhibit! I didn't return, but I wanted a stamp anyway!


Photobucket
My outfit for the meetup. I finished this the day of the meetup ^^;
Photobucket
We got this fabric as a group order! Hako and Amelie sent their fabric to a taobao shop (OT) with a design sketch and they made the dresses for them. How nice!
This is a good way to get custom-made dresses made with your own choice of fabrics/ribbon/trims. I'm not sure what other taobao shops offer this service, but it doesn't hurt to ask!
Photobucket
A group photo!

Wednesday, July 18, 2012

Sparkle Stitches~ Scallops

This is a "sewing basics" tutorial for scallops. I'm adding scallops to the bodice of the Bunny Tea Party JSK I'm making, so I decided to do a tutorial on scallops along the way~

Tools Needed:
*ruler
*tailor's chalk or disappearing pen
*protractor or a circle object you can trace
*fashion fabric

Directions:
Click on the photos to make them larger.

1) First, decide how big your scallops are going to be. If it is a bodice or neckline detail, you'll obviously want it smaller. If it is a skirt hem, they'll probably be bigger.

For an equal number of scallops, take your width of fabric and divide it by the number of scallops you want. This will give you the diameter of your scallops.

2) Draw your scallops. Halve the diameter to get the radius and set your protractor to the proper size. Another way to do this is to simply find something round (a can, jar, cup, tube, plate, etc.) and trace it on the wrong side of the fabric. Draw a horizontal guideline for where you want the base (red) of your scallop to be and a guideline for where you want the point between your scallops (black) to be. The two guidelines will be x inches apart where x is your scallop radius. The guidelines are really optional, but it keeps everything even ;)
This is your stitching line.
Photobucket

3) Pin your fabric and facing together and stitch right on the scallops you just drew. I find it much easier to trim off the excess after stitching rather than adding seam allowance, cutting out the scallops, pinning them together, and then trying to keep them from moving apart while stitching. Stitching a smooth curve isn't easy, so practice on some scraps, first!

Point!
At each "point" between two scallops, take one horizontal stitch. This will help you turn the fabric more easily. If you fabric is thick (e.g., corduroy, velvet, etc.) take two or three stitches as necessary. Try it on scrap fabric first to see how many stitches makes the best scallops!
Photobucket
The stitches are highlighted in green. The turn stitch is circled in red.

4) Trim your seam allowance. There are two ways to do this: You can leave a half-inch of seam allowance and clip notches into your curves, or you can trim your seam allowance close to the stitching. Clipping notches is more time-consuming, but safer. Trimming your seam allowance very narrow is quicker, but if it is somewhere that gets rubbed or pulled a lot, it may come undone.

Point!
At each "point" between two scallops, trim the seam allowance right up to the stitch. Be very careful not to cut through the stitching line or you will end up with a hole! If you don't trim closely enough to the stitching line, your scallops will pucker at each point.
Photobucket

5) Turn your scallops right-side out and press. Now is a good time to check for any puckering between the scallops. If you find any puckers, flip the area wrong-side out again and trim a little closer to the stitching line. Give everything a good press and make sure your scallops look like nice semi-circles. If you made the scallops too deep, they will end up lookin like "flaps" or "scales." If you made them too shallow, it will look like an uneven hem.
Photobucket

6) Topstitch your scallops! I like to edgestitch at 1/8" from the edge.

Point!
Do not take an extra stitch at the points when topstitching (highlighted in green)! Simply stitch right up to the point, leave your needle in the fabric, lift the presser foot, turn your fabric, set the presser foot down, and continue stitching. This is the topstitching so take your time and make sure it looks lovely!
Photobucket

7) Give everything a final press and you are done!

Monday, July 16, 2012

Lolita Runway Challenge ~ Materials Post!

Thank you to everybody who is continuing in the challenge!

Note: to those of you who aren't following the challenge, sorry for the recent Runway Challenge post spams! I am also queing another sewing tutorial, so please look forward to that! I may also post more "daily life" photos and hopefully more simply Taiwan-related things. I've been busy despite it being summer ^^; Thanks for continuing to follow my blog!

1: Sparklewolfie
Photobucket
Here are my materials~
A woven tartan fabric
Crochet cotton lace
Plush ribbon
Elastic
And white cotton lining (not pictured)

Let's see what everybody else is using!

2: Miss Rose
Miss Rose
Miss Rose has an adorable teddy-printed tartan fabric!! Some lace and ribbon to accompany will make a beautiful dress!

3: Madeline Hatter
Due to technical difficulties, photos are not available but she told me she bought them already ^u^ and will be posted on Wednesday

4: Eithne
Eithne
Her fabric looks just like the original *u* Gorgeous!

7: HimeBlackOnyx
Blog Post Here

Thank you for keeping up, everybody! Let's get patterning and sewing!

The next step is:
Draft, drape, or alter patterns if using. Post photos of your patterns and post them as a comment to this post. If you are using an unaltered commercial pattern, you can just leave the pattern number. If you keep a blog you can link it in the comments for your entry, too.
Deadline: July 30th

Sunday, July 8, 2012

Lolita Runway Challenge~ Dress Designs are In! Get Your Materials Ready ;)

Thank you to everybody who is going to be doing this challenge!
I've collected all the entries and am going to put them together into this post :)


Photobucket
Follow the jump for all the entries!

1: Sparklewolfie
Photobucket
This is my fashion sketch of the above dress. I drew the pattern way too small ^^;
Description:
Full Shirring
Three tier skirt with lace n each tier
Elastic cap sleeves
Shirring with lacing in the back
Detachable waist ribbons

2: Miss Rose
Tartan Check Ribbon Shirring Princess JSK II, Brand: Baby the Stars Shine BrightRelease Year: 2009Price: ï¿¥20,790Available Colors: Cherry Pink, BlackMeasurements: 84cm length, 60~98cm bust, 56~80cm waistMaterials: Tartan check (65% polyester, 35% rayon) and cotton (100%) fabric, lining (100% polyester)Additional Information: The dress has front and back shirring.
Miss Rose, Design Sketch from Miss Rose

3: Madeline Hatter
Madeline Hatter, http://thebloodyteaparty.blogspot.com/2012/07/lolita-runway-challenge-part-i.html
blog post entry

4: Eithne


5: F_B
Edward Skull SK, Brand: Alice & the PiratesProduct ID: 104P513Release Year: 2008Price: ï¿¥22,890Available Colors: Pink, Gray, BlueMeasurements: 22cm length below corset (short), 51cm length below corset (long), 66~78cm waistMaterials: Fabric (65% polyester, 35% rayon)Additional Information: The sash is detachable.

6: Pie
Original Tartan Check JSK, Brand: Alice & the PiratesRelease Year: 2009Price: ï¿¥18,690Available Colors: Cherry Pink x Black ribbon, Black x Cherry Pink ribbonMeasurements: 91cm length, 82cm bust, 74cm waistMaterials: Fabric (100% cotton), lining (100% polyester)Additional Information: None

7: HimeBlackOnyx
HimeBlackOnyx, Inspiration: Original Tartan Check JSKStyle: HimeColor: Pastel (pink, lavender or blue)Elements: baby doll, princess seam skirt, back shirring, corset lacingCoordinate:·         blouse·         wrist cuffs·         neck bow·         pearl crown·         earrings·         A-line petticoathttp://isleofmilkandhoney.blogspot.tw/2012/07/project-lolita-challenge-1-design.html
blog post here
Description:
Inspiration: Original Tartan Check JSK
Style: Hime
Color: Pastel (pink, lavender or blue)
Elements: baby doll, princess seam skirt, back shirring, corset lacing


Coordinate:
· blouse
· wrist cuffs
· neck bow
· pearl crown
· earrings
· A-line petticoat

Thank you everybody!

The next step is:
Choose and purchase materials, and post photos of them as a comment to this post. If you keep a blog you can link it in the comments for your entry, too.
The fabric only needs to by some sort of tartan. It can be printed, woven, tartan combined with other prints, or you can add solid colors to some panels of your dress, but tartan must be a feature.
Budget: US$50. If you are using leftover material, estimate the value.
Deadline: July 15th

I'm excited to see what you all create!

Sunday, July 1, 2012

Change it Up! On Removable Hair Pieces

Hairstyles make a big impact on the overall look of an outfit. The cut, styling, and accessories can completely alter the way your coordinate looks, or even the way YOU look!

I've been contemplating getting a feathered hime cut for the past two years. While a hime cut is a staple in Lolita fashion, I was afraid I would hate the look on me, get annoyed with having something on my face, and/or be unable to keep up with the trimming!

Finally, I decided to buy clip-on bangs with the last wig group order we had. They were very cheap (around US$3-6 I think) but have passed as real hair. Clip-on bangs tend to be able to get away with cheaper fibers because you can blend it with your real hair. The surface area is also much smaller than falls, extensions, or a full wig, so even if the fibers are a bit shiny, there won't be as many of them to catch the light the wrong way.

I wore the bangs for the first time when filming a Lolita short for my schoolmate's class project (unfortunately, most of the girls involved in filming have requested to not have the film posted anywhere, so I cannot share it!)


Photobucket
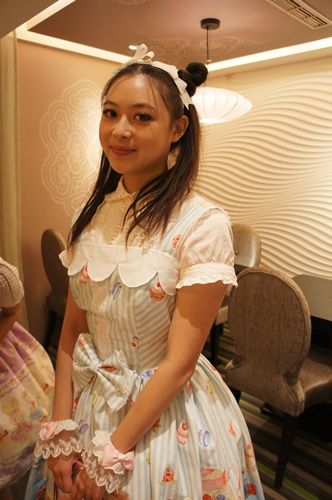
This is how I look with bangs and my hair down.

Photobucket
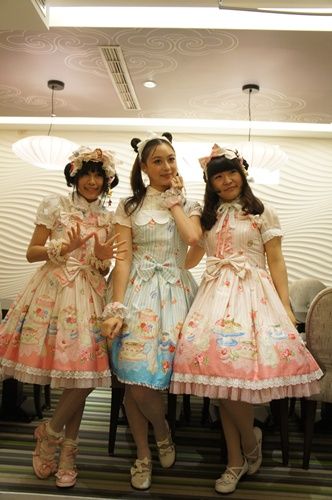
This is with my hair in pigtails!

There are actually longer pieces at the sides, but they have blended into my natural hair so cannot be seen.

I think I look quite different compared to my normal, bangless state! I like both looks, so I won't be cutting my hair, but will definitely wear these bangs more!

They do need a bit of a trim on one side ;) The hairs kept poking me in the eye so I had to brush them out of the way, which is why there is a slight gap.

Removable hair pieces are awesome because they are not as expensive or hot as full wigs, don't need to be sewn or glued in like extensions, and provide quick, easy changes in look! Being able to blend your natural hair in with the fibers also makes them look much more real. KAMIKO has a pair of curly hair falls she wears over her natural, curled pigtails. When the falls and her natural hair are mixed together, it is near impossible to tell she is wearing falls!

Have you ever tried removable hair pieces? Or do you prefer to just take some scissors and chop away? Hair grows back, so it's really not a big deal ;) I would love to know about others' experiences!

P.S. I changed my header :) The background is of a mountain in Taiwan that I visited when I was in the summer camp I joined when I first arrived here. It was quite beautiful!!