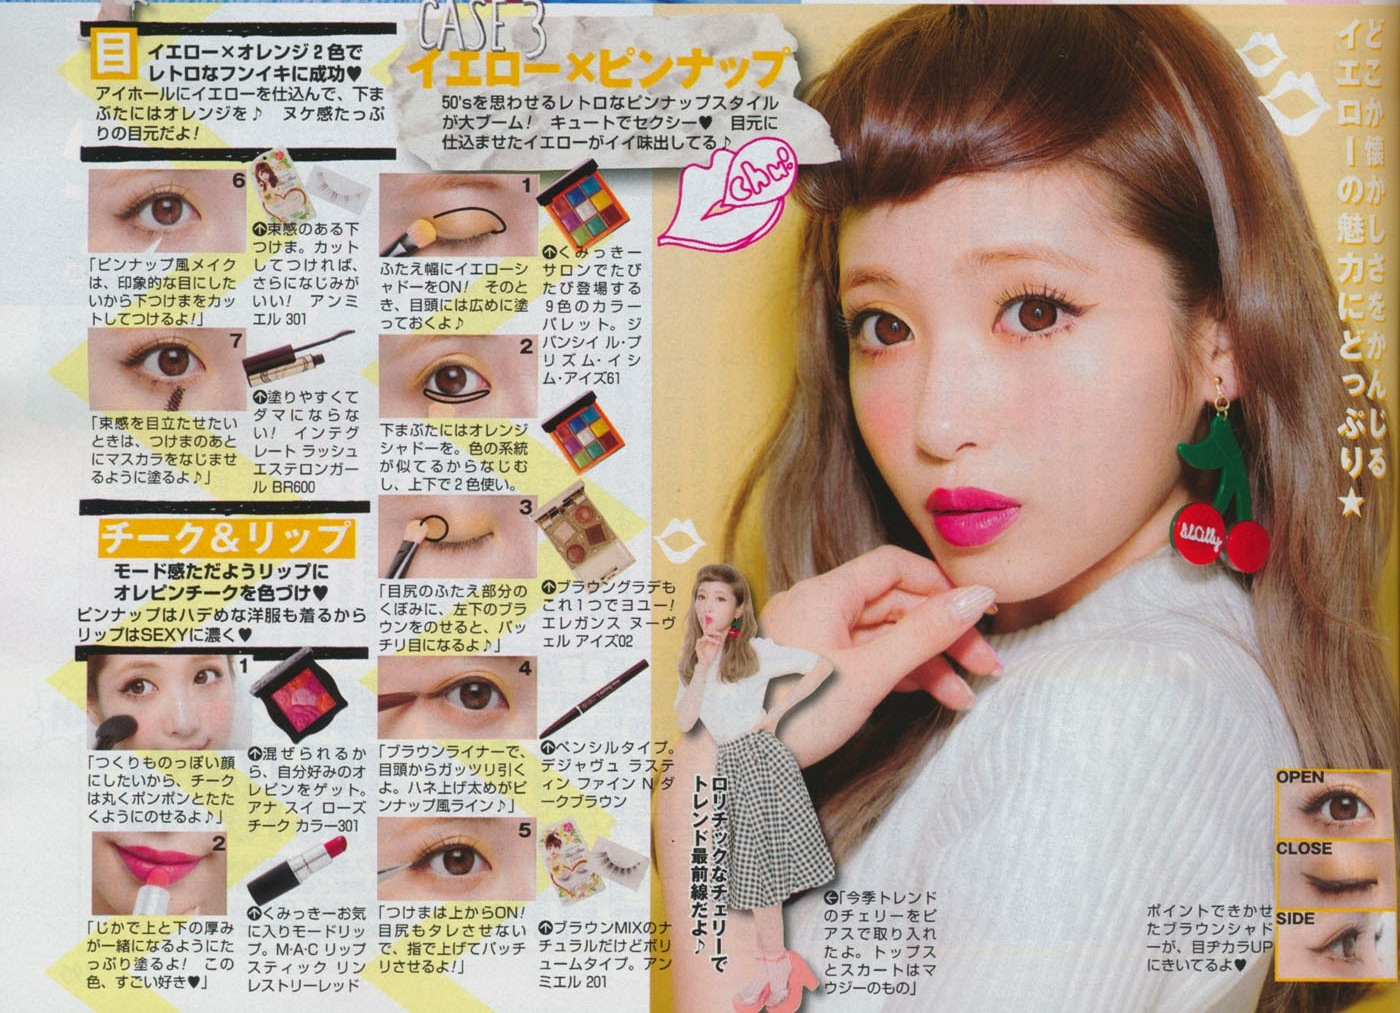
Last case of the Kumikki Color Make tutorials! This is a retro theme! I tried to do my hair like hers as well for the finished photo. Today is a lesser-seen color in makeup: yellow. Mixed with the pinup theme, it's not something I have seen or would have thought of myself.
Showing posts with label tutorial. Show all posts
Thursday, June 30, 2022
Popteen Kumikki Color Make Tutorial Case 3: Yellow x Pinup
Monday, June 27, 2022
Popteen Kumikki Color Make Tutorial Case 2: Pink x Girly
Today is about Case 2: Pink x Girly from the Kumikki Color Make tutorial series! I'll be honest; I do not like this one as much, despite pink being one of my favorite makeup colors. I believe it is largely due to having different products as well as my eyelids having visible discoloration.
Tuesday, June 21, 2022
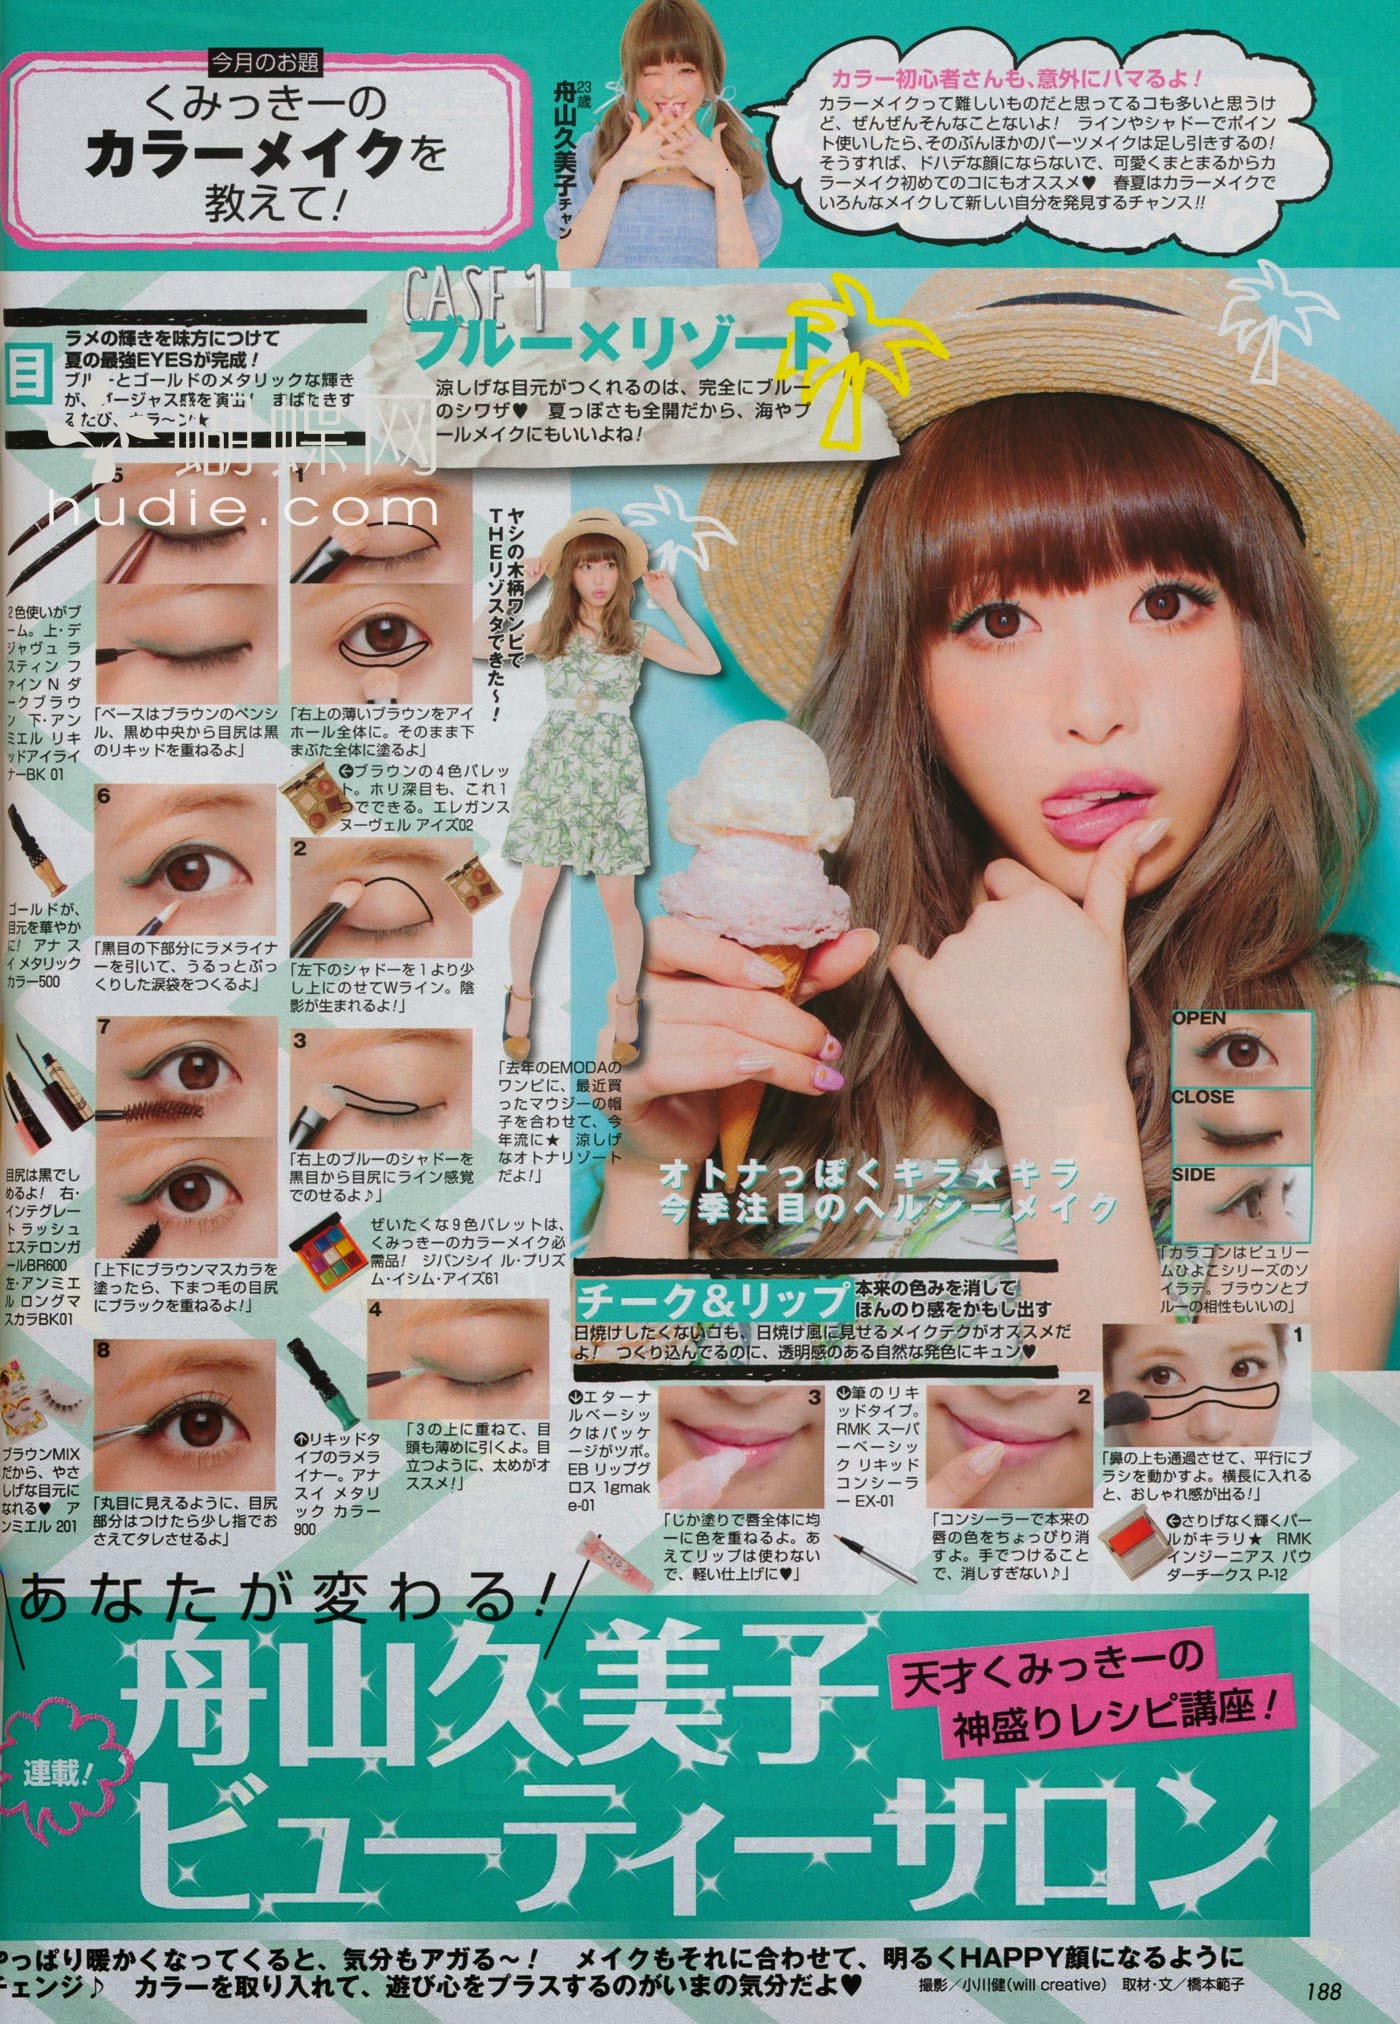
Popteen Kumikki Color Make Tutorial Case 1: Blue x Resort
Recently I was scrolling old photos and saw some magazine scans I'd uploaded to my Google Photos. I thought I'd give some of these makeup tutorials a try! They're from quite old editions of Popteen, perhaps late 2000s or early 2010 eras. Because I did not upload the entire magazines and the original sources are no longer being hosted (I checked) I am unable to find the rest of the scans.
I thought I would try out some くみっきのカラーメイク (Kumikki's Color Make)!Today I tried Case 1: Blue x Resort
Tuesday, December 22, 2020
Soda Can Upcycle
How many of you purchase things 100% for the packaging? I definitely fall for packaging a lot, and back in 2016-2017 or so, a Taiwanese soda water brand, Ocean Bomb, collaborated with Pokemon to create limited-edition cans. I don't drink soda water, but I sure do like Pokemon!
I've been moving the cans around with me from place to place, and finally, one of the cans accumulated enough air inside to misshapen and explode. Given that I cannot get these cans any more, I wanted to save it!
![]() |
| Explosion! |
Friday, December 4, 2020
Packing tips for international flights
Safely landed in Taiwan and out of quarantine time now! Fortunately, I was able to quarantine at my mom's, though I had to remain in one room only. I took photos of some packing I did and thought I'd share about my ideas and what I did for moving internationally!
First step is to just declutter as much as possible. As I was leaving with no intention of returning to stay, I straight up threw away anything I had not used during my time (1.5 years) in the USA. Because I had moved there recently, I had not that many things anyway, but had accumulated some crafting items so I had to go through and decide what is replaceable and what is worth bringing.
Next, for jewelry that may become tangled, I threaded the chain portion through a straw and connect the clasp again. Reusable straws can work too, but I found this pack of disposable ones at the house.
Then, I placed the necklaces on a clean towel and rolled it up. I secured the roll with my bracelets to keep them in shape
Most of the necklaces only fit one side of the necklace into the straw because the lobster claw clasp is too large for this size. If you have a chunky necklace, a boba straw can work, too!
For my pressed powder products, I put a cotton round on top to add a buffer and help prevent them from shattering during the trip. While powder product can usually be re-pressed if it shatters, it saves you the mess and the hassle!
Of my powder pans, the Wet n Wild was definitely the most "loosely" pressed and fragile, but it survived just fine!
I actually dropped my Laura Mercier shimmer bloc while packing and it shattered... it is a baked formula with four divided colors so I decided just to declutter it since I only used two of the colors anyway. And of course, the two I used most were the ones that shattered the worst and got mixed up along with debris on the floor!
For squeeze-tube liquid products, get the air squeezed out of them before putting the lid back on. The air pressure in the plane will change and the cargo area is not pressurized as much as the cabin, so the air will expand inside these soft tubes! Make sure there is room for it to expand so you do not end up with a mess like I did on my original flight to the USA... one of my concealers had a little accident O_Q
Of course, then bag all liquids in resealable plastic bags, and then place them all together in another waterproof bag. My checked suitcase has a built-in waterproof compartment so that is what I used. If you are packing them directly on clothes, definitely use multiple layers of plastic!
Deciding what to put in my carry-on luggage was also important. On the off chance that luggage is delayed, rerouted, lost, etc., it is important to have your vitals (medication, ID, work-related things) on your person as well as a change of clothes for a few days.
Electronics already are in my backpack, so that was a simple choice, and then I chose the most "hassle-free" clothing I could. I packed a soft no-wire bra (from UNIQLO), a dress with a built-in bra top (also UNIQLO), and easy-care cotton T-shirts and skirts, a hoodie for warmth, a blanket (can be used on the plane, too!), a journal and pens, some hair elastics because long hair can tangle easily, and as many socks and underwear as I could shove into the spare spaces around everything else.
Check your checked baggage! Because I was moving, not traveling, I decided to go with overweight bags. It would end up being more affordable to pay the flat charge to get 20lb. extra in each bag than to replace 40lb. worth if things back in Taiwan.
HOWEVER, because my flight was cancelled and (14 hours of customer service later....) I was rebooked with a different airline, the overweight fee was DOUBLE the original.
What would have been US$100 total for two overweight bags became US$200 !!! That was not worth it. Fortunately, my friend Duke had an extra suitcase he gave me, as a third checked bag (up to 50lb.) was US$100 or so. Ended up being a much better deal!
When weight is not the main issue, being able to cram everything in became the biggest problem. I used vacuum-sealing bags for my Lolita clothing and petticoats, sweaters/hoodies, and wore my overcoat and boots to save space.
If you do not have actual vacuum-sealing bags with the one-way valve and everything, you can actually create a similar effect with regular sturdy bags (I recommend kitchen bin bags), filling it with compressible items, pushing out as much air as possible, and then sticking a vacuum hose in the opening to further compress it. Cinch the top of the bag closed with your hand and tie a knot (do NOT use the drawstring as it will not be airtight) as quickly as possible after removing the vacuum hose.
Pack the vacuumed bags soon after compressing, just in case it is not a perfect seal and air begins to slowly leak in. I stuck the bags in the suitcases, filled the spaces around them with smaller items, and then slammed the lid down and zipped the cases shut. One of the bags DID reinflate on the flight over, but it ended up not being a big deal since I already had everything crammed in.
That's it for my very belated, short little tips/tutorial! I'm in the process of moving into my own place now, so I'll update again after.
Thanks for sticking around and there will be more fun things soon!
Sunday, July 5, 2020
No Heat Curls Tested
Curls are cute! Curls are volume! Curls are oh so common in Lolita fashion and other dolly looks! However, as somebody with naturally straight hair, curls just don't stay for me. I've been testing out heatless curling techniques for ages, from covering my head in mini-buns (so difficult to sleep on) to using foam rollers (got the ends tangled) to heat styling with curling wands once by a hair stylist for a fashion show, and once at a salon for a tea party. Neither professionals were able to keep my hair curled for a day. And that was not even curling my full hair length - I had my hair up in buns (think Sailor Moon hair, but with the pigtails only reaching my jawline.)
Since then, I've settled for just making waves by braiding my damp hair into two to five braids depending on how small I wanted the waves to be. But still, I dream of curls~
I've tested this new method out four times now, and it has worked every time. I used no hair products at all, so I'm sure you can get a neater or more voluminous effect with various fluffing sprays, styling hold mousse, curl enhancers, etc.


Monday, May 25, 2020
Fluffy Odango Hairstyle Without Teasing
Voluminous hairstyles are often achieved through copious amounts of teasing (backcombing), but it can damage fine or already-damaged hair even further! It also requires careful brushing at the end of the day to untangle the teasing without tearing or breaking your hair.


This hairstyle can be done as a single fluffy bun, double odango (buns), or even half-up fluffy buns! Though if your hair is long like mine, you may need to make two segments in the twintails when you do a half-up. I will make a note in the instructions for this!
I found this to be quite easy, though I do suggest you use a mirror. Because I was taking photos in the 3-season porch, I had no mirror ^^; That is why my hair ends up a bit messy, but I hope you can understand the main idea!
Tools:
- hair ties
- bobby pins
- corkscrew pins (optional, but VERY helpful!)
- hair decorations (ribbons, clips, pearls, scrunchies, etc.)
Directions:
Start by putting your hair up in twintails where you want the buns to be. You can also do this as one large bun, or one or two half-up buns.
Tie another hair tie at the end of one ponytail. If you have layers, try to tie it at the end of the shortest layer so you don't get frizzies.
If you have very long hair or are doing this as a half-up, you may need to tie two extra hair ties instead of one; tie the first halfway down the tail, and then the second towards the end.
Form a hole in the middle of the hair between the two hair ties and flip the ponytail end through two times.
Once you have the ponytail flipped, grab small bunches of hair at the outside edges and gently pull to loosen the twisted hair, making it full and fluffy. This is what gives you the volume!

Now that you've got your desired fluffiness, form a bun as usual by wrapping the tail around the base elastic. Make sure to tuck the tail in at the end so the straight parts don't show!
Secure your bun either with a corkscrew shape pin, or with several bobby pins. The corkscrew shape is really easy to use and secure! It also allows me to use more bobby pins for the fine-tuning later as they won't be fighting for space with all the other bobby pins I'd have to use just to secure the bun if I didn't have the corkscrew one!

Almost done! Sorry this photo is difficult to see detail, but dark hair is difficult to photograph and I don't have a hair light >_<;;
Pull and arrange the fluffy bits of your bun to a shape you like and secure it with bobby pins. I used brightly-colored hair ties to make them easy to see, so I had to make sure to cover them up with my hair fluff. Of course it is better to use hair ties that are clear or match your hair color!
If you do not use a mirror, you may end up looking a bit wonky like this:
Decorate with whatever you like! I tend to use lacy scrunchies as they help cover up any tails or elastic I failed to hide, are quick and easy and secure, and I feel like they help hold the buns in place as well.
This is a nice hairstyle for warmer months if you want to keep your hair off your neck. I find that this is both faster and fluffier than doing a braided bun as the braiding takes more time, and even with fluffing, the braid is flatter that this flipped version.
Experiment with pearls or gems on pins, ribbons woven in, clips, hair combs, etc. Remember that you can also add cute clips or colored hair pins to the back of your head! Or perhaps a light veil or trailing crystals? Use your creativity!
Please let me know if this was helpful at all! I originally had filmed it as a video but the footage was unclear and I couldn't edit it to make it better so I redid it as a photo tutorial instead. Thank you for reading and commenting as always! Let me know if you have any fun ideas for how to decorate odango looks :3
Sunday, November 18, 2018
Cyndaquil//Pokemon Makeup
Sunday, September 9, 2018
Thursday, August 9, 2018
Chinese Style Hair Tutorial
In preparation for this month's Lolita meetup, I've been doing a bit of history and also just watching historic cosplayers' tutorials. Many hairstyles require false hair bits (I've used those before in my dance troupe for performances) but I found one that could work for Lolita fashion. I've worn my hair is similar ways before, but this time I loop the tail end of the twintails back to be more historically accurate (and cute!). I braided my hair as it the texture holds the shape better, but the historic cosplayer I saw did the hairstyle without braiding it, so mine is a modern take.
I also made video tutorials for this style! There are two ways to do it depending on how long your hair is ^u^ Currently my hair is only medium-long so I do it the "cheating" way
| You can't even see the buns because my hair accessories are so large |
Labels:
Rapunzel's LookBook,
Style,
Taiwan Lolita,
tutorial,
video
Wednesday, August 8, 2018
Easy Kawaii Ribbon DIY
Here is a quick and easy way to make cute ribbons! I learned this during my internship at Blasphemina's Closet (no longer in business) and it's how I've quickly made ribbons ever since!
Materials:
*fabric of choice
*fusible tape
Tools:
*iron
Monday, July 30, 2018
Easy Gothic Bat Wing Eyeliner
I had some spare time so I filmed my favorite Gothic eyeliner look, which is really very easy to do!
English version:
Wednesday, April 18, 2018
Smokey Silver Gothic Lolita Makeup Tutorial
I haven't been able to make custom thumbnails because after my laptop was reset I lost my Photoshop T^T So I just have to pick the least derpy looking screenshot that Youtube offers!
Chinese version:
Monday, January 22, 2018
Rainbow Makeup Tutorial (CH and EN)
This was a very fun look to do! Just make sure to take time to layer and blend the colors so that they flow nicely from one color to the next. You can also do this look "upside-down" and put the cool colors on the bottom and the warm colors on top ^u^v
Saturday, January 13, 2018
Basic Gothic Makeup Tutorial (CH and EN)
I'm putting my Japan posts on hold until I can get the photos from my friend. In the meantime, I'm still practicing editing video footage (I took some footage in Japan, but am not sure if it can be used)
So here is a quick and easy Gothic look!
Sunday, December 17, 2017
Bright, Colorful Deco Makeup
Eyeshadows: Medusa's Makeup
Eyeliner: Avance
Mascara: Avance + Essence Princess Lash
Blush: Dior
Lipstick: BH Cosmetics (Color Lock)
繽紛彩色DECO妝
眼影: Medusa's Makeup
眼線: Avance
睫毛膏: Avance + Essence艾森絲 Princess Lash
眉筆: 大創
腮紅: Dior
口紅: BH Cosmetics (Color Lock)
IG: @_sparklewolfie_
Tuesday, December 12, 2017
Ribbon Tights DIY
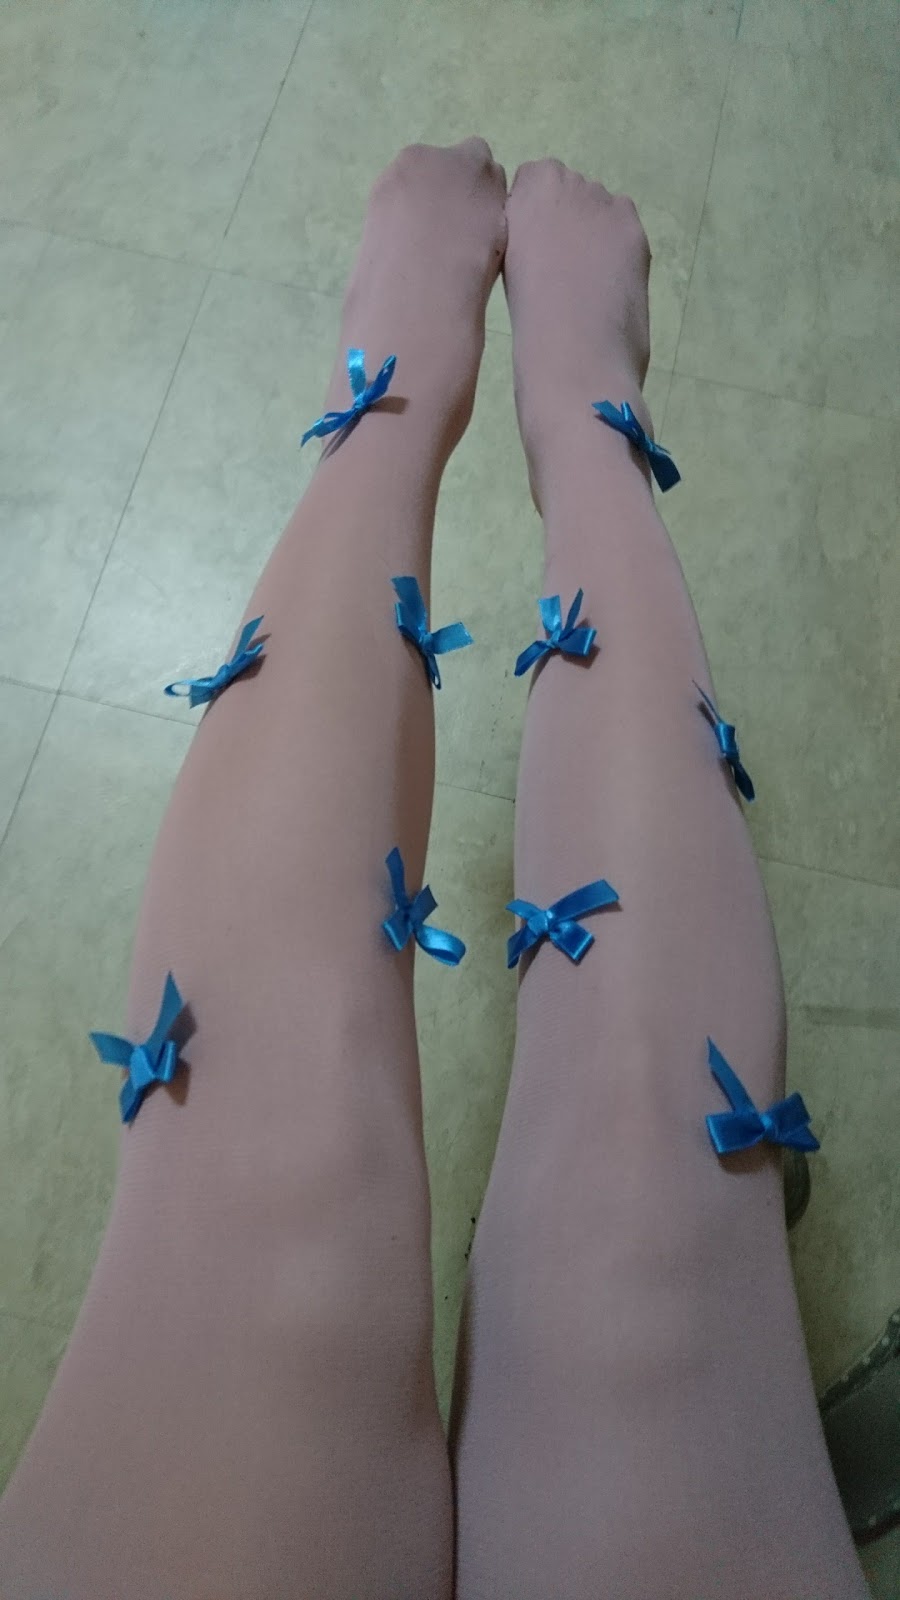
This hardly requires any direction, but I wanted to share how I upgraded my pink tights!
I haven't worn these in ages simply because the shade of pink is slightly off from my other pinks (other Sweet Lolitas, you understand the struggle!)
So I decided to add a contrasting color so I can wear these with other coordinates.
It is really as simple as it looks. Tie small ribbons (seal them by sewing or gluing inside the knot) and then stitch them carefully to your tights. I opted only to stitch them to the lower legs so they wouldn't get in the way of my bloomers and petticoat.\
Tip: Stitch with a thin thread and needle so as to not risk creating runs in your tights!
I haven't worn these in ages simply because the shade of pink is slightly off from my other pinks (other Sweet Lolitas, you understand the struggle!)
So I decided to add a contrasting color so I can wear these with other coordinates.
It is really as simple as it looks. Tie small ribbons (seal them by sewing or gluing inside the knot) and then stitch them carefully to your tights. I opted only to stitch them to the lower legs so they wouldn't get in the way of my bloomers and petticoat.\
Tip: Stitch with a thin thread and needle so as to not risk creating runs in your tights!
Thursday, April 6, 2017
Daily-Style Cyber Kawaii Makeup Video EN and CH
Recently I went out with my mom and decided to film the makeup as I did it! Really, I just made it up as I went along so I had to edit out so many pauses.
The color combination turned out really prettily in my opinion, so I'm pleased with it!
English Version:
Chinese Version:
Sadly it seems my camera angle tilted back a little bit so I'm almost off-screen during the talking portions, but I think that the tutorials are still understandable. I also showed more of the application process this time around!
Anyway, I'm having fun exploring different styles and practicing makeup and video editing. I know the editor I use has far more functions than I am using, but I am still learning how to do just some basic things.
Thank you for reading or watching my videos! I'd appreciate any feedback. I also don't have lighting, but I hope it is bright enough to see clearly. Since I don't plan to be a "YouTuber" I'm not going to invest money in equipment or anything, but just try to do my best with what I do have. Next time I may change my filming location to see if the lighting gets any better!
The color combination turned out really prettily in my opinion, so I'm pleased with it!
English Version:
Chinese Version:
Sadly it seems my camera angle tilted back a little bit so I'm almost off-screen during the talking portions, but I think that the tutorials are still understandable. I also showed more of the application process this time around!
Anyway, I'm having fun exploring different styles and practicing makeup and video editing. I know the editor I use has far more functions than I am using, but I am still learning how to do just some basic things.
Thank you for reading or watching my videos! I'd appreciate any feedback. I also don't have lighting, but I hope it is bright enough to see clearly. Since I don't plan to be a "YouTuber" I'm not going to invest money in equipment or anything, but just try to do my best with what I do have. Next time I may change my filming location to see if the lighting gets any better!
Wednesday, March 22, 2017
Rapunzel's Lookbook~ Heatless Waves
I love adding texture to my super straight hair, but don't like using heat stylers. I also have rather long hair (which I recently cut, as mentioned in my previous post) so in these photos my hair is over 60cm long!
Many curl patterns don't work on such lengths of hair, but here is one I've been using since grade school that has always worked well for me and is easily adjustable to all lengths of hair and a wide variety of looks!
Materials:
*hair binders
Many curl patterns don't work on such lengths of hair, but here is one I've been using since grade school that has always worked well for me and is easily adjustable to all lengths of hair and a wide variety of looks!
![]() |
| Today I opted for looser waves |
*hair binders
Subscribe to:
Posts (Atom)