Showing posts with label Sparkle Stitches. Show all posts

Wednesday, August 8, 2018

Easy Kawaii Ribbon DIY

Here is a quick and easy way to make cute ribbons!  I learned this during my internship at Blasphemina's Closet (no longer in business) and it's how I've quickly made ribbons ever since!

Materials:
*fabric of choice
*fusible tape

Tools:
*iron

Tuesday, December 12, 2017

Ribbon Tights DIY

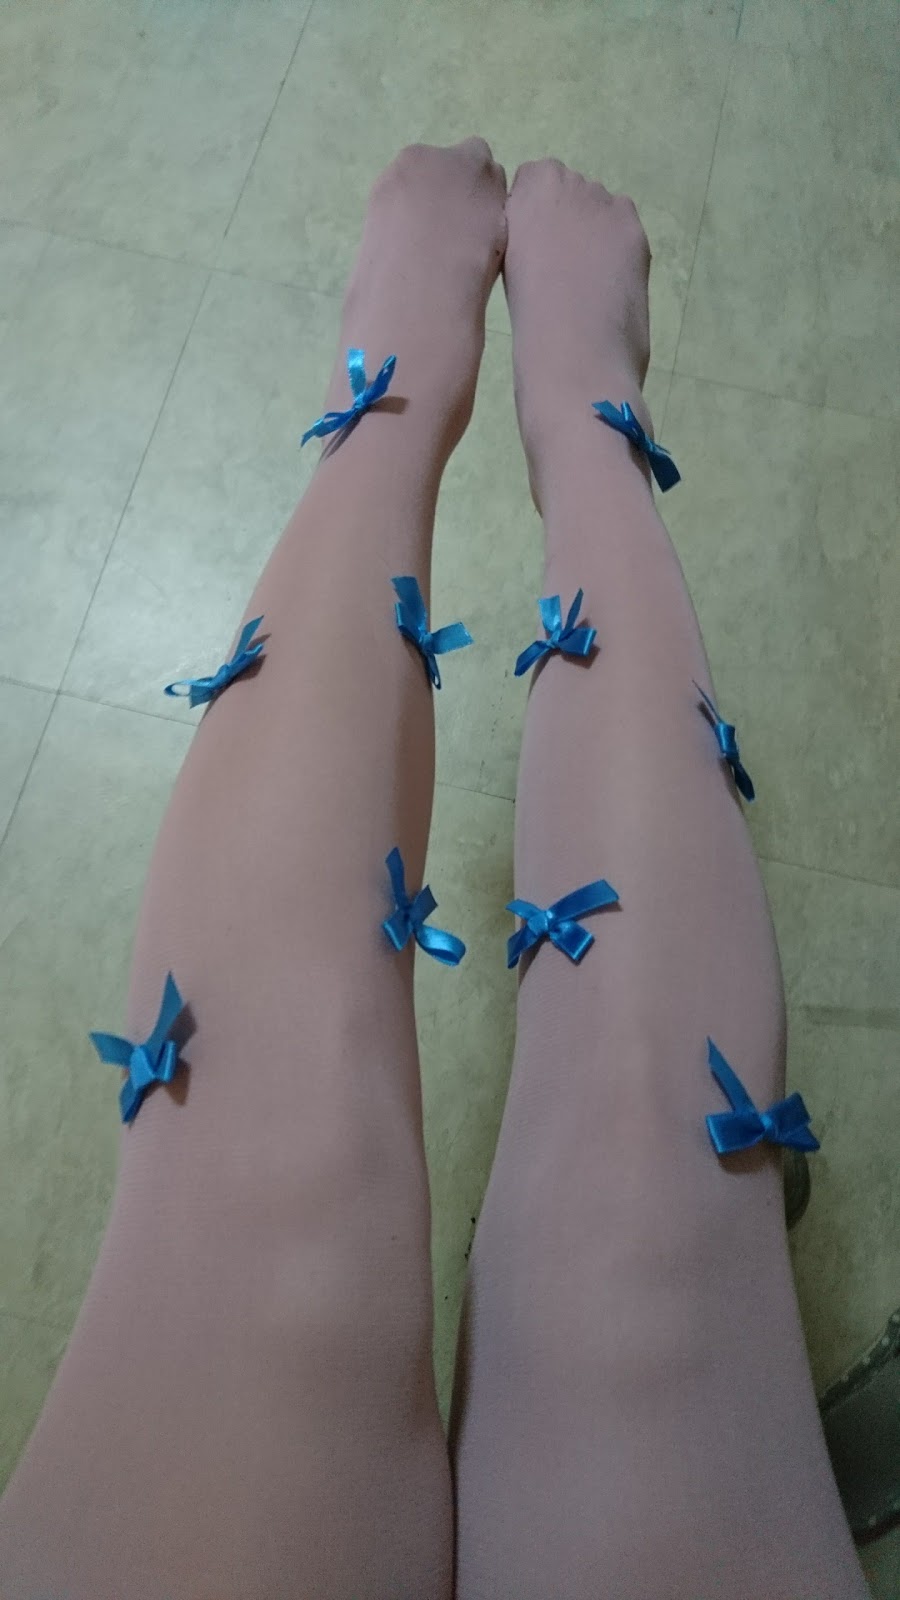
This hardly requires any direction, but I wanted to share how I upgraded my pink tights!
I haven't worn these in ages simply because the shade of pink is slightly off from my other pinks (other Sweet Lolitas, you understand the struggle!)

So I decided to add a contrasting color so I can wear these with other coordinates.
It is really as simple as it looks. Tie small ribbons (seal them by sewing or gluing inside the knot) and then stitch them carefully to your tights. I opted only to stitch them to the lower legs so they wouldn't get in the way of my bloomers and petticoat.\

Tip: Stitch with a thin thread and needle so as to not risk creating runs in your tights!

Friday, November 18, 2016

Sparkle Stitches~ Scallop Hem Tutorial

I did a scallop tutorial a few years ago, but here is a redo anyway! It's a good basic skill to have.

I like the effect of scallops, but they are really rather fiddly and time-consuming. There are also many small mistakes to watch out for! So now I'd like to share the things I've learned over the years.

Materials:
*Skirt
*Matching fabric at least 10cm wide X hem length
*Matching thread
*Sharp shears

Monday, September 5, 2016

Simple T-shirt Reconstruction

If you follow me in instagram you will likely have seen this simple T-shirt reconstruction I posted:
Slightly spooky?
 Though it's easy, I personally really like to see simple sewing tutorials. T-shirt reconstruction is actually what got me started in both sewing and Lolita fashion, actually!

I'd been reconstructing my Theater (school drama club) T-shirts and looked online for ideas and tutorials. I found the t_shirt_surgery community on livejournal, and one of the recent posts was a Lolita t-shirt surgery with links to BABY, THE STARS SHINE BRIGHT and Angelic Pretty websites!  I'd previously only known about Lolita fashion through visual kei, Mana-sama, and Moi-Meme-Moitie, but this completely different style of sweet Lolita led me to the egl community and the rest is history~

OK that had nothing to do with this post -_-;

Thursday, June 16, 2016

How to Cover "Toothy" Headband

Headdresses are usually tied on with a ribbon, but I actually prefer to have them on a headband; it helps them stay on more easily without pins in my opinion.

Brand headbands tend to be completely covered with fabric, but I like the type of headband that has teeth on the underside to help with griping, as my hair is rather slippery.  Recently I made the above canotier style headdress on a toothy headband.  Though it was in a coordinating pink color, I covered the top side with lace and took photos along the way!

Wednesday, March 23, 2016

Lace and Ribbon Hair Bows Tutorial

Small hair ribbons are easy to make and dress up any hair style easily.  They can also be pinned or clipped onto boleros, handbags, wrist stoppers, etc.

Today I will show a quick and eay way to make some lace and ribbon hair bows, which can be made completely by hand if you don't have any sewing machine!  You also only need very few materials ^u^v

Materials:
*Ribbon
*Edge lace trim
*Needle
*Thread

Tuesday, June 30, 2015

Sparkle Stitches~ wrist stops

I've previously done a tutorial on wrist stops but here is a different one. I'm slowly getting back into the swing of things and don't have internet so this is a mobile post 


First is materials. You need lace and elastic. I got an elastic with lace edging to add frills to the finished project. Cut the elastic to your wrist measure!


Place the lace and elastic right sides together, lining up the raw edge or the lace with the plain edge of the elastic.   Stretch the elastic as you stitch.  Stitch along the dotted line.

Next, flip up the elastic so you are looking at the right sides. Stitch along the dotted line, remember to stretch the elastic as you stitch!

Now to make your gathered lace band into a circle, place WRONG SIDES TOGETHER and stitch the opening shut as shown.

Trim the seam allowance as needed if it's too wide. Two millimeters should be fine.

Then turn the cuff inside out and stitch the short side again.   This will encase the raw edges inside, creating a French seam.

Turn right side out and you will see you perfect closure.

 Add any decoration you'd like to the front.

Repeat and you're done!!

Thursday, December 5, 2013

Bunny Cell Phone Pouch

Hooray for the second installment in the English Gothic and Lolita Bible sewing tutorials! I chose an easier-looking project, the cell phone case from the final volume, and am happy to report that it is fairly easy to make and customize.

Materials:
*20cm faux fur fabric
*15cm fusible interfacing (I did not use it)
*35cm of 24mm-wide ribbon (optional)
*2 eyes
*stuffing
*black embroidery floss
*decorations

Difficulty: Easy
Time: 90 minutes


Directions:
1) Cut out all your pieces. Keep in mind the direction of the fur! I like to trace all the pieces on the back of the fabric before cutting so I can double-check to make sure the fur is going the way I want. I suggest using a box-cutter or other type of small blade to cut the fur fabric from the BACK to avoid having bits of faux fur flying around as you would have if cutting with scissers. Cut through the woven back layer, leaving the fur as uncut as possible.
Note: keep your ears and arms separate! They look similar and it is easy to confuse them. (The rabbit ears and arms, not yours!)

2) Stitch the head pieces together. Stitch the two halves of the face (front) down the center, and then the two halves of the back down the center. This will give you two circular pieces. Also stitch your arm and ear pieces together so you end up with two arms and two ears.

3) Pin the ears to the face (front) right-sides together with the ears pointing DOWN so the seam allowances line up with the face piece seam allowance like so:
 photo WP_000098_zps45a17d43.jpg
This ensures that when you stitch and turn the head, the ears will stand UP.

4) Stitch the face and back of the head together, leaving the neck open for stuffing later. Turn the head right side out and it should look like this:
 photo WP_000099_zpsbce3546a.jpg

5) Stitch the body pieces together. It took a bit of careful eye-straining to figure out how the body was supposed to look based on the photo in the mook (white on white really doesn't show up well!) and messed up at first. The seam should be running down the center front and center back. It is clearer just to show the picture:
 photo WP_000100_zps0592e16b.jpg
Then roll down the top and stitch it down so the top edge is finished.

6) Stuff the bunny head and embroider a face and eyes (or use buttons.) Stitch the neck closed.

7) Stitch the arms and head onto the front of the body by hand. I think the arms would look nicer if they were stuffed too, so you could try it! I found that the placement of the head should not be right at the top edge, but rather flat against the front in order to keep the bunny from having a strangely long neck:
 photo WP_000258_zpsf4533604.jpg
 photo WP_000261_zpsd9697113.jpg
In the profile picture you can see how the head is lower down on the front of the body.

Optional:
Decorate with ribbons, crystals, embroidery, etc.
Add a ribbon handle to help keep the cell phone pouch closed, as the head weighs it down unevenly
Add a button and elastic closure to keep it closed
Make a little bunny tail to stitch onto the back
Add wire armature inside the arms so you can pose them
Use microfiber cloth to make a lining so your phone screen gets cleaned while it is in the bunny pouch

As always, thanks for following and be sure to leave any comments or questions below! Thank you!

Thursday, November 7, 2013

Kana Ruffle Blouse: Editing Needed!

Today I decided to try another EGLB sewing pattern, and decided on the Kana Ruffle Blouse from the third volume. I took photos of the steps as I went, but I found several issues with the pattern and directions that I'd like to mess with before actually doing a tutorial because... well, it just is difficult and some parts don't make sense!

This is what it looks like so far (no buttons because I'm not sure I want to bother)
 photo CIMG0087_zps8cb5ee58.jpg

When I get more fabric I'll try it again. If you'd like to see a list of what I found trange with the pattern and directions, keep reading:

*Collar pattern is strangely curved
*Collar doesn't seem to fit correctly
*Collar stand and collar are attached in a very strange and difficult way
*Cuffs are attached in a strange and difficult way
*Front darts go above the bust point, which makes no sense unless your chest is larger than your bust
*The sleeve cap is very shallow, making the sleeves naturally hang at an outwards angle rather than straight down, meaning there is more fabric bunching up at the underarms when the arms are relaxed
*Directions say to "fold the placket as shown" but there are no pictures or anything showing how to fold it (don't worry, it's easy)

Wednesday, November 6, 2013

EGLB Sewing Tutorial: Mille Fleur & Mille Noir Mini Fur Cape

A long time ago, in a galaxy far, far away, I said that I would make sewing tutorials for the English Gothic and Lolita Bibles that I own because the printed directions are really vague.

Well, after my first foray into the Kana Knickerbockers pattern, which didn't match up, I became quite disheartened and gave up for a while. Today I gave it another go with a simpler pattern from the fourth EGLB:
 photo 518u2BK70w6L_SY344_BO1204203200__zpsafaa1ab9.jpg

The majority of the patterns in this volume are knitted patterns (I am awful at knitting... crochet is more my thing!) but the Mille Fleur & Mille Noir pattern for a Mini Cape is rated one star, so it should be a good one to start with!

First of all, you need to copy the pattern pieces. There are only two, but they are both labeled "Fabric x1" so you will see in the photos I made a mistake.

Materials:
*45cm X 80cm fur fabric
*45cm X 80cm lining
*130cm of 36mm ribbon
*80cm of 15mm wide stabilizing tape (fusible)

NOTE: I did not use stabilizing tape!

I originally wanted to copy the printed directions and add my own notes, but the given instructions are such rubbish that it would make no sense, so I wrote my own!

Time: 4 hours (it did not take me four hours)
Difficulty:♥○○○○

Directions:
1) Cut your fabric. The larger piece is the fur fabric, and the crescent shape is the lining. They are both labeled "fabric" so I thought the cape would have a collar and cut both in fur!
 photo CIMG0064_zps9a944bc4.jpg
The white pieces are the pattern pieces.
Make sure to notch where noted so you can match up your pieces later!
Also cut your ribbon in half lengthwise so you have two ribbons.

2)Finish the ends of your ribbons so they don't unravel. Roll the end twice to encase the raw edge and then stitch like so:
 photo CIMG0065_zps68a883d4.jpg
Finish just one end on each because the other end will be sewn into the cape, and finishing the ends would create a bulge.

3)Match the notches on the curved edge of the two pattern pieces, right sides together (that is, the furry side facing the right side of your lining). Pin your ribbon ends to the fur with the long tails hidden between the two layers of fabric. Stitch up until the notches at the neckline where the pattern had a squiggly line (means it needs to be gathered).
Turn your cape right-side out.
 photo CIMG0068_zps1bb63dff.jpg
Trim or shave the fur from the seam allowances to reduce bulk!

4)Hand-sew the neckline, matching up the center of both pieces. The fur piece will fold down to meet the lining piece because it is larger. This allows a clean-look when the cape is worn so the lining doesn't show.
 photo CIMG0069_zps2894eeb1.jpg

That's it! You're done!
Here is what it looks like being modeled by my dress form, Caroline:
 photo CIMG0071_zps79e1cc1a.jpg
 photo CIMG0072_zps93bd64bc.jpg

I hope you enjoyed this little tutorial. If there are any questions or if anything is unclear, please leave me a comment to let me know!

Saturday, July 6, 2013

Sparkle Stitches~ Candy Covered Buttons

Sweets for summer! Sorry I haven't been updating much. I thought summer would mean lots of spare time and posts. Evidently, it is not so.


Yesterday I had some spare time and decided to do some hand sewing and use up some of the fabric-covered button bases I have.
 photo CIMG5500_zps1e262097.jpg
It is very simple and doesn't take much time!

Materials:
*Fabric-covered button bases
*Scrap fabric
*Ribbon
*Elastic (hair elastics or elastic thread you can use to make your own)

Directions:
NOTE: There are a lot of tutorials online for the basic, fabric-covered button already, so I will be abbreviating that portion!
1) Cover button
Cut your fabric to be slightly larger than your button base.
Hand-sew a straight gathering stitch around the perimeter, pull the thread, and place it over the domed button.
Do not put the button back on yet!

2) Make your candy ties
Cut your ribbon to double the length you want one tie. Fold it in half, pleat, and stitch in place.
 photo CIMG5496_zpsae10e60c.jpg
Here I've shown one half stitched on and one not stitched on.
Stitch the ribbon ties to the seam allowance of the gathered candy button base.
 photo CIMG5500_zps1e262097.jpg

3) Put the back on and add elastic
Snap the back of the button on. You can add a spot of glue if you want, but since the elastic will keep the back on, I didn't bother.
 photo CIMG5499_zps25aa70ac.jpg
If you have ready hair elastics, thread it through the button back and loop it through itself.
If you are using elastic, cut a length and knot it off. Loop it through itself through the button, keeping the knot hidden. You can use a single candy on one elastic, or do two on one like the upper picture.

Note! In the double-candy elastic, I used fabric squares for the candy ties, but I think ribbon is cleaner, faster, and easier
Point! Add embellishments! I've used netting overlay on a few candies. You can also add thin ribbon at the ties, add embroidery or cabochans to the candy center, use lace, etc. Let your imagination go wild!
Point! Use these buttons for headbands, badges, decoration, jewelry, magnets, or anything else you can think of

Please share any crafts you do with covered buttons! I bought a pack of 100 so I'm looking for more ideas to use them up!

Wednesday, July 18, 2012

Sparkle Stitches~ Scallops

This is a "sewing basics" tutorial for scallops. I'm adding scallops to the bodice of the Bunny Tea Party JSK I'm making, so I decided to do a tutorial on scallops along the way~

Tools Needed:
*ruler
*tailor's chalk or disappearing pen
*protractor or a circle object you can trace
*fashion fabric

Directions:
Click on the photos to make them larger.

1) First, decide how big your scallops are going to be. If it is a bodice or neckline detail, you'll obviously want it smaller. If it is a skirt hem, they'll probably be bigger.

For an equal number of scallops, take your width of fabric and divide it by the number of scallops you want. This will give you the diameter of your scallops.

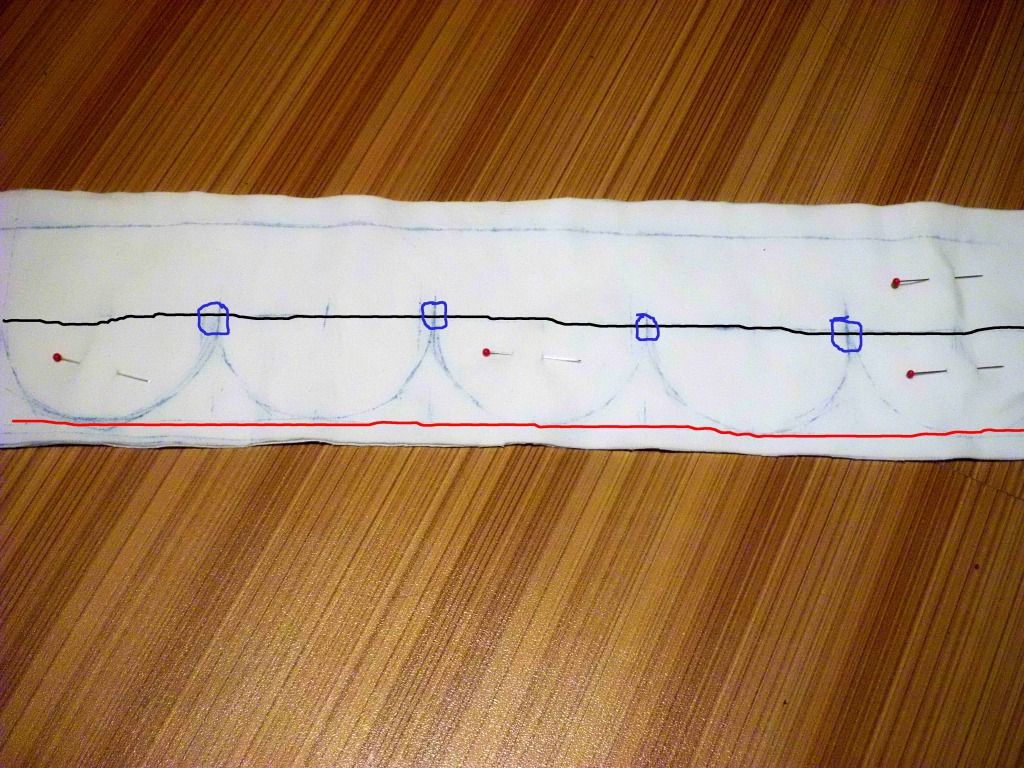
2) Draw your scallops. Halve the diameter to get the radius and set your protractor to the proper size. Another way to do this is to simply find something round (a can, jar, cup, tube, plate, etc.) and trace it on the wrong side of the fabric. Draw a horizontal guideline for where you want the base (red) of your scallop to be and a guideline for where you want the point between your scallops (black) to be. The two guidelines will be x inches apart where x is your scallop radius. The guidelines are really optional, but it keeps everything even ;)
This is your stitching line.
Photobucket

3) Pin your fabric and facing together and stitch right on the scallops you just drew. I find it much easier to trim off the excess after stitching rather than adding seam allowance, cutting out the scallops, pinning them together, and then trying to keep them from moving apart while stitching. Stitching a smooth curve isn't easy, so practice on some scraps, first!

Point!
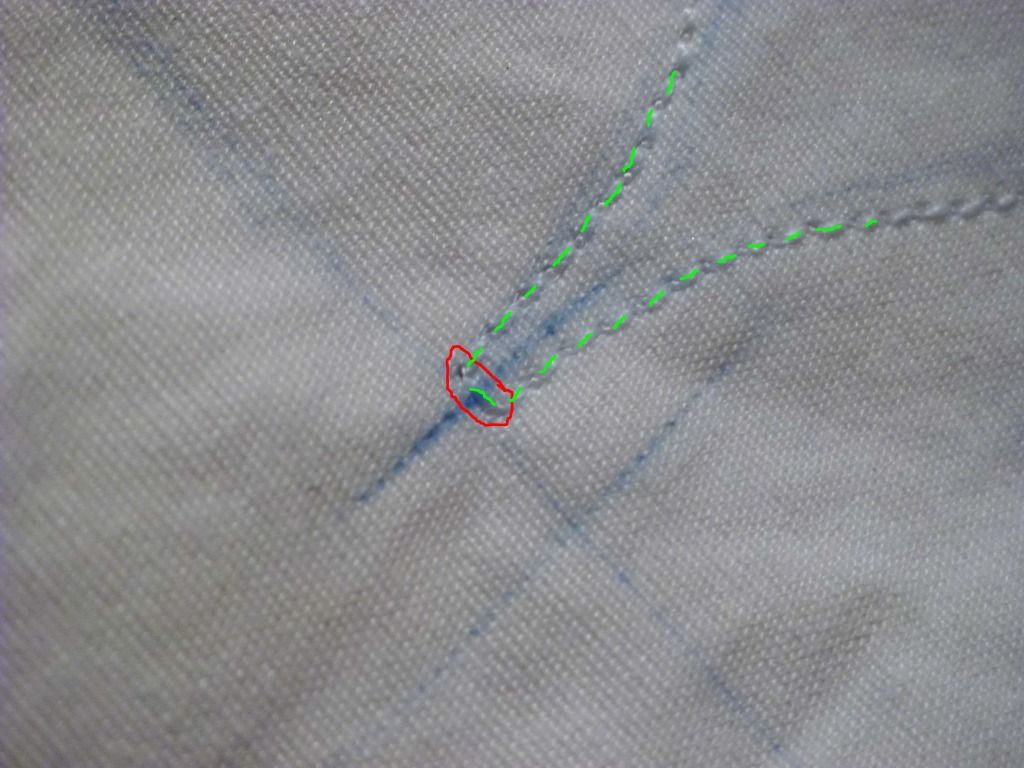
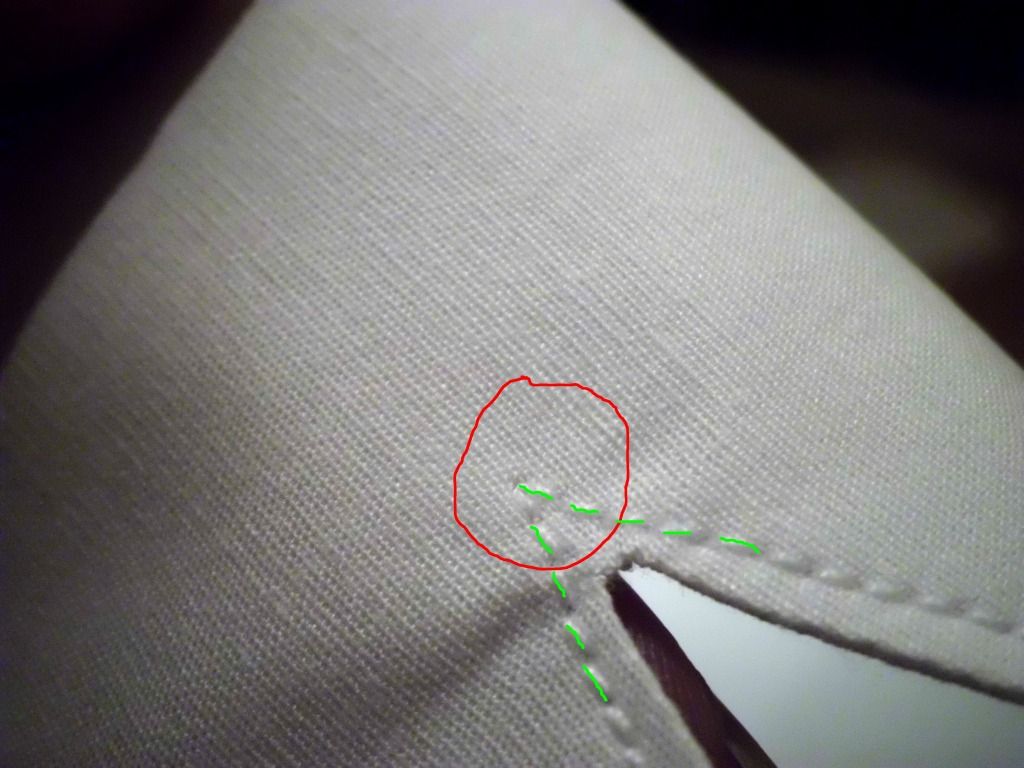
At each "point" between two scallops, take one horizontal stitch. This will help you turn the fabric more easily. If you fabric is thick (e.g., corduroy, velvet, etc.) take two or three stitches as necessary. Try it on scrap fabric first to see how many stitches makes the best scallops!
Photobucket
The stitches are highlighted in green. The turn stitch is circled in red.

4) Trim your seam allowance. There are two ways to do this: You can leave a half-inch of seam allowance and clip notches into your curves, or you can trim your seam allowance close to the stitching. Clipping notches is more time-consuming, but safer. Trimming your seam allowance very narrow is quicker, but if it is somewhere that gets rubbed or pulled a lot, it may come undone.

Point!
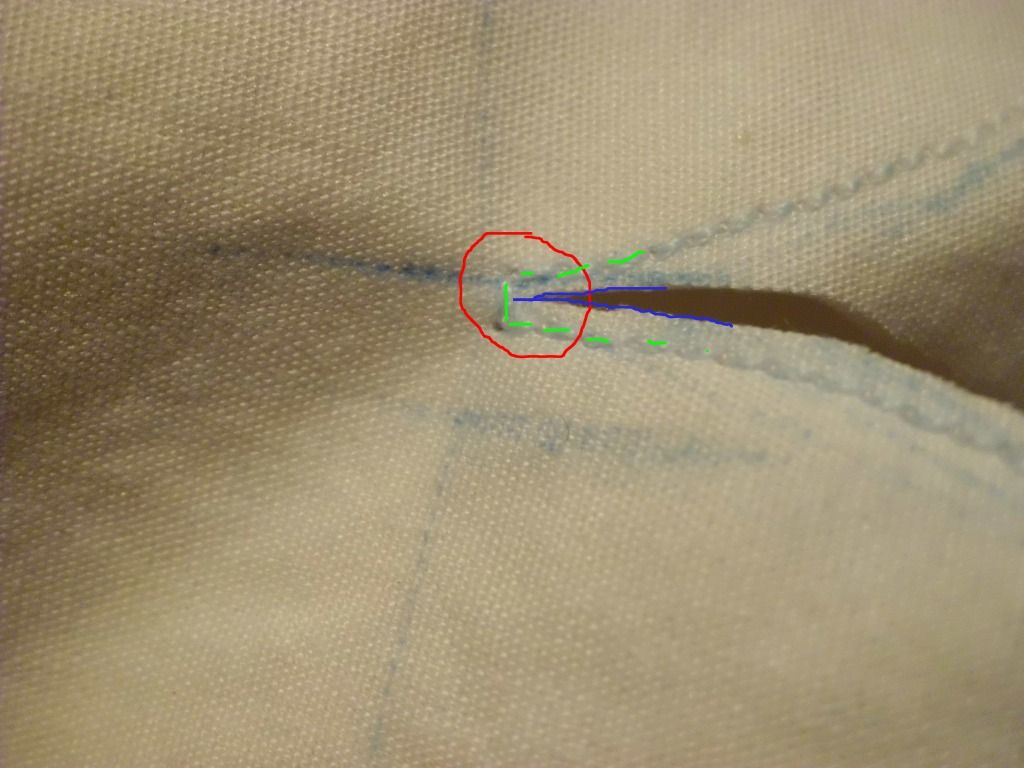
At each "point" between two scallops, trim the seam allowance right up to the stitch. Be very careful not to cut through the stitching line or you will end up with a hole! If you don't trim closely enough to the stitching line, your scallops will pucker at each point.
Photobucket

5) Turn your scallops right-side out and press. Now is a good time to check for any puckering between the scallops. If you find any puckers, flip the area wrong-side out again and trim a little closer to the stitching line. Give everything a good press and make sure your scallops look like nice semi-circles. If you made the scallops too deep, they will end up lookin like "flaps" or "scales." If you made them too shallow, it will look like an uneven hem.
Photobucket

6) Topstitch your scallops! I like to edgestitch at 1/8" from the edge.

Point!
Do not take an extra stitch at the points when topstitching (highlighted in green)! Simply stitch right up to the point, leave your needle in the fabric, lift the presser foot, turn your fabric, set the presser foot down, and continue stitching. This is the topstitching so take your time and make sure it looks lovely!
Photobucket

7) Give everything a final press and you are done!