
Recently I was scrolling old photos and saw some magazine scans I'd uploaded to my Google Photos. I thought I'd give some of these makeup tutorials a try! They're from quite old editions of Popteen, perhaps late 2000s or early 2010 eras. Because I did not upload the entire magazines and the original sources are no longer being hosted (I checked) I am unable to find the rest of the scans.
I thought I would try out some くみっきのカラーメイク (Kumikki's Color Make)!Today I tried Case 1: Blue x Resort
Because my Japanese is quite poor and the scan text is small, I could only do my best!
I also attempted to imitate the photo styles from the magazine~

Eyemake Steps:
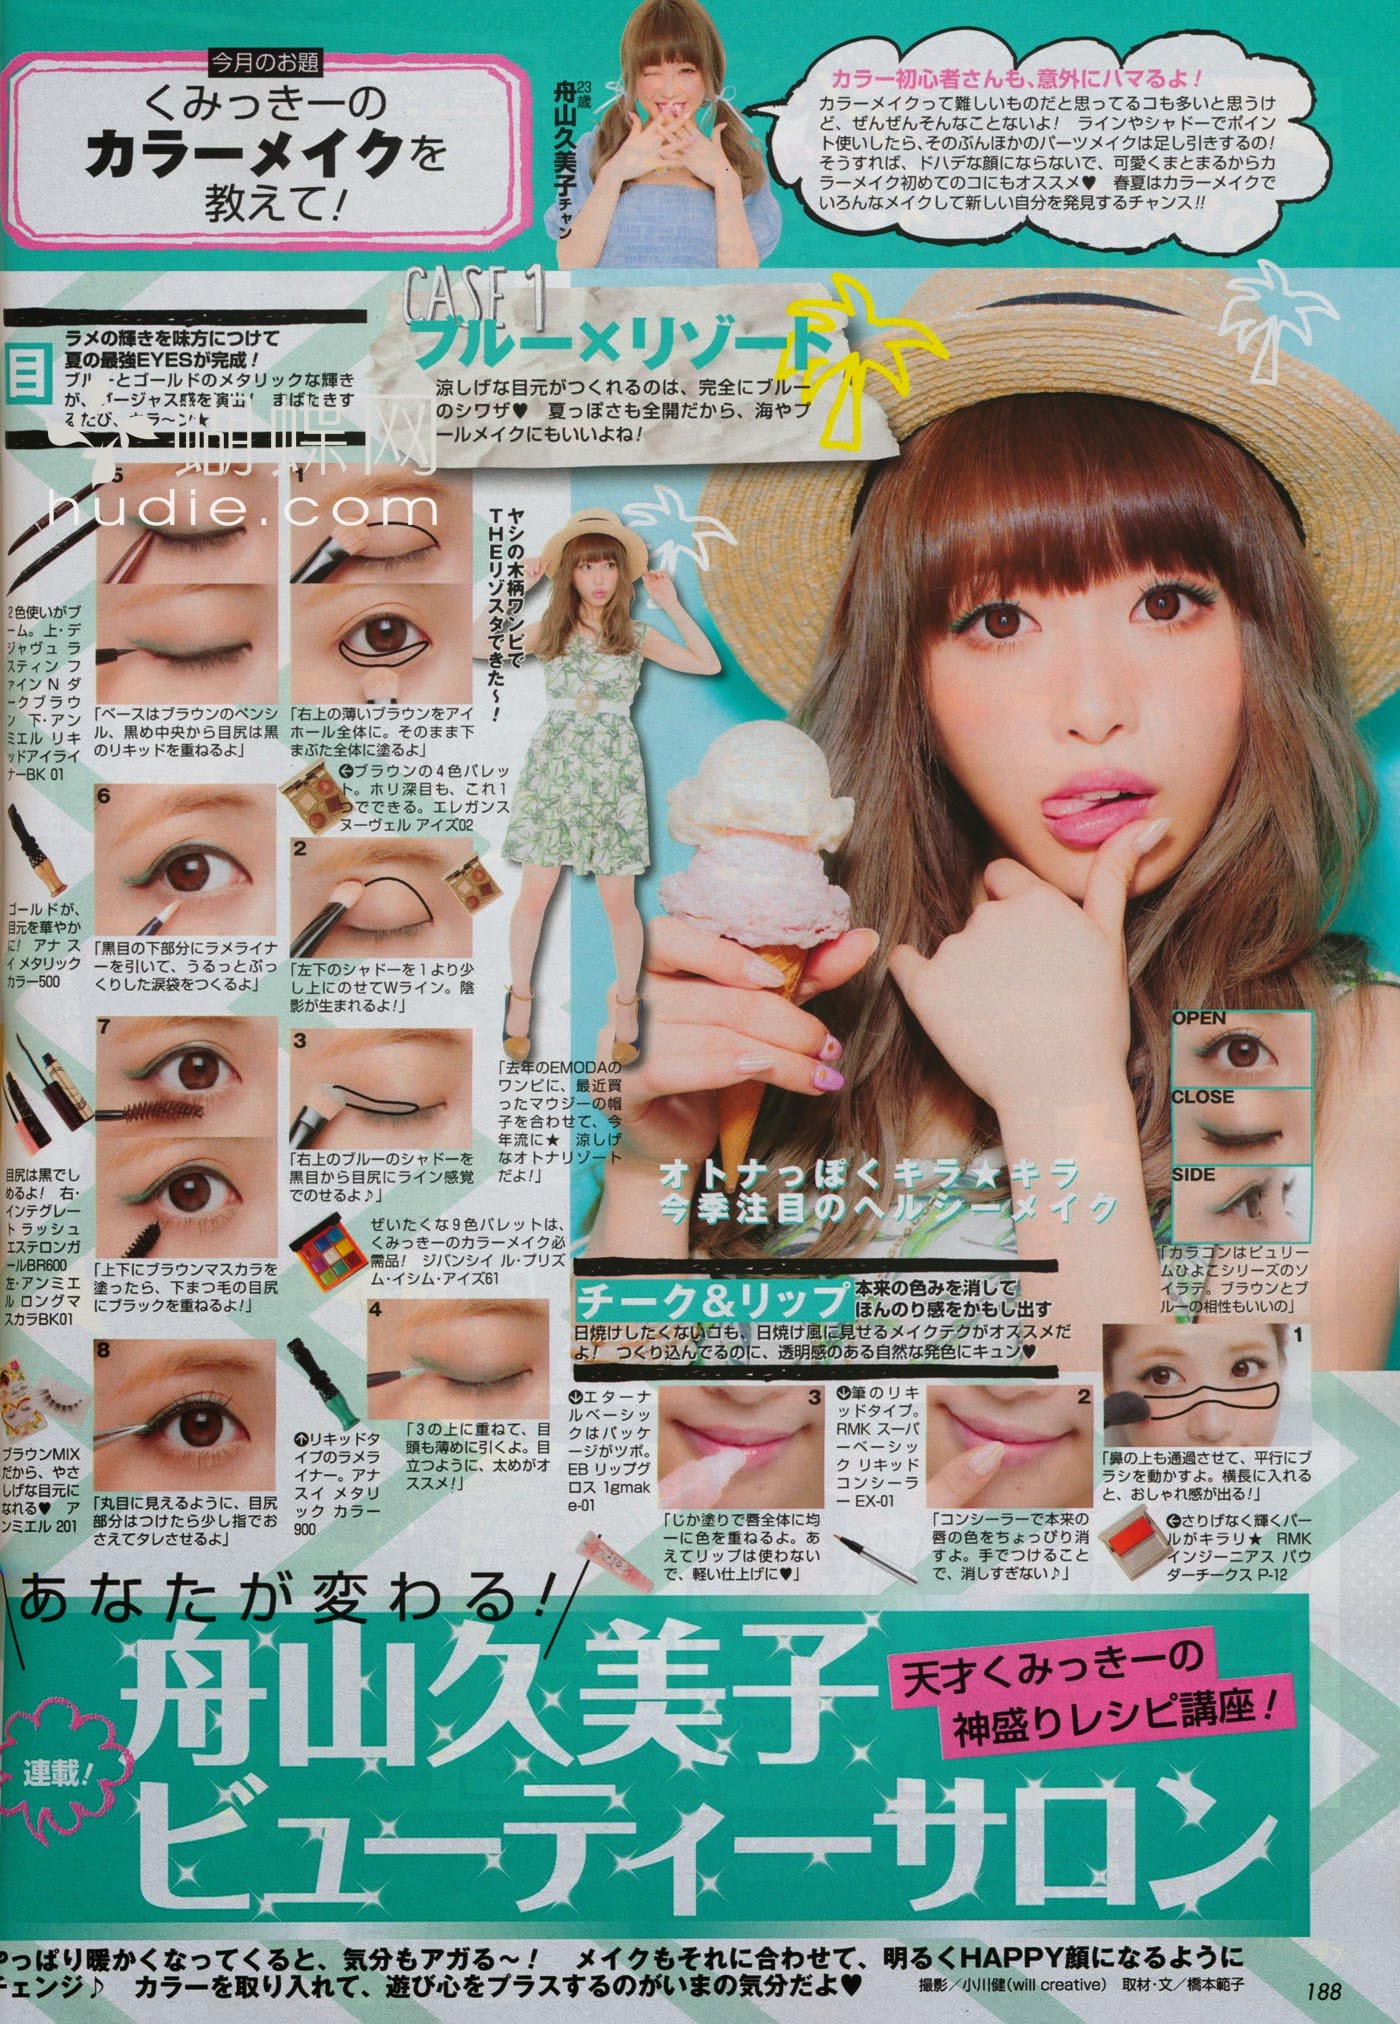
1. Cover the full eyeball in brown (upper right shade.)
2. Apply the lower left shade above the area in 1 in a W line. I have no idea what this means so I used a darker brown in the area shown in the picture!

3. Use a blue shadow (upper right in their palette) to apply from the iris to the end along the lashline. I used Fortune from my Trendy in Tokyo palette, also in the upper right!
4. A liquid-type larme liner is used on top of 3 (Anna Sui Metallic Liner). This step I think is just adding a sharper wing and some bling. I did not have such a liner, so I added a drop of eyedrop to Lively, a shimmer blue shadow on an angled brush to do my glitter wing.

5. Use a base of brown liner and then use black liner from the pupil to the end of the eye. I am not 100% certain that's what this step means, but I do not own a brown liner in any case, so I used my Essence felt-tip liner which is not very dark and did a simple liner. I normally draw on my inner corner as well to balance out my eye shape.
6. Apply a larme liner under the pupil of the lower lashline. I'll be honest: I just missed this step entirely!!
7. Apply a brown mascara on all lashes, and a black mascara on the outer corners of the lower lashes. Again, I don't have brown mascara, so I simply used black on all! Mixing different colored mascara like this sounds like an interesting effect.
8. Apply false lashes, which I did not do.
Face Makeup
1. Apply blusher over the cheeks and nose bridge in the area shown as a horizontal line. I never do my blush this way as I normally apply it to the tip of my nose rather than the bridge. Generally, I also bring it higher up on my cheekbones than illustrated. The look done as shown seems very summery!

2. Use concealer on the lips to lighten the natural color of your lips. I do not like putting concealer on my lips at all! Instead, I actually have a "concealer lipstick" from Candy Doll that I patted on with my finger

3. Apply a lipgloss (the one they use is shown) on top of your lips. I used Essence Shine Shine Shine in a pinky color. It has glitters in it so I thought it seemed similar to the Eternal Basic one they show.
Final look!


Originally I was going to put all the tutorials together into one post, but I feel this is long enough so I shall do them as separate posts instead.

There was nothing said about the eyebrows so I didn't do anything to mine. Overall, it's a very different look to what I normally wear and looks very summer. I think it is due to the "sunburn" blush.
The eye contouring is almost opposite to how I normally contour the socket as the darkest part is towards the nose whereas I usually put my darkest shadow at the outer corner. It was nice to try this out! There was no face contouring mentioned either. Kumikki has a cute V-shape face so maybe she doesn't need it as much as I do. My jawline is wide so I usually either contour the jawbone or contour under my cheekbones (or both) to make my face look not as big and flat when I wear makeup.

What do you think of this makeup? I'm not sure I'll try this blush again since I feel my wide jawline benefits from having blush higher up on my cheekbones. I wish I had a V-line face, but I don't :3 So I will adjust the looks to suit my face!
No comments:
Post a Comment
please share your thoughts!